Creating a WordPress Site A Comprehensive Guide

Contents
- 1 Introduction to WordPress Site Creation
- 2 Getting Started with Your WordPress Site
- 3 Understanding the WordPress Dashboard
- 4 Selecting the Appropriate Theme for Your WordPress Site
- 5 Essential Plugins for Your WordPress Site
- 6 Creating Engaging Content for Your WordPress Site
- 7 Mastering the Art of Blogging for Your WordPress Site
- 8 Customising Your WordPress Site with Widgets
- 9 Optimising Your WordPress Site for Search Engines
- 10 Enhancing User Experience on Your WordPress Site through Navigation
- 11 Optimising Mobile Responsiveness for Your WordPress Site
- 12 Securing Your WordPress Website
- 13 Safeguarding Your WordPress Site through Backups
- 14 Monetizing Your WordPress Site
- 15 Integrating Social Media with Your WordPress Site
- 16 Analytics and Tracking for Your WordPress Site
- 17 Troubleshooting Common Issues on Your WordPress Site
- 18 Conclusion: Navigating the WordPress Site Creation Journey
- 19 Frequently Asked Questions (FAQs) for Your WordPress Site
- 19.1 Q1. How can I choose an appropriate domain name for my WordPress site?
- 19.2 Q2. Is it possible to change my WordPress theme later on?
- 19.3 Q3. What are the recommended SEO practices for a WordPress site?
- 19.4 Q4. How frequently should I back up my WordPress site?
- 19.5 Q5. What security measures should I implement for my WordPress site?
Introduction to WordPress Site Creation
Creating a website has become an essential aspect of establishing an online presence, whether for personal branding, business, or sharing information. Among the various platforms available, WordPress stands out as a versatile and user-friendly content management system (CMS) that empowers individuals and businesses to build a professional website without the need for extensive technical expertise.
Brief Overview of WordPress
WordPress is an open-source CMS that powers a significant portion of the internet. Initially designed for blogging, it has evolved into a robust platform capable of supporting various types of websites, from simple blogs to complex e-commerce sites. One of its key strengths lies in its user-friendly interface, allowing both beginners and experienced users to navigate and customise their websites efficiently.
Importance of Having a Website
In the digital age, having an online presence is crucial for personal and professional growth. A website serves as a virtual storefront, offering a platform to showcase your skills, products, or ideas to a global audience. Whether you’re an entrepreneur, blogger, or artist, a website provides a centralised hub for your content, making it easily accessible to anyone with an internet connection.
Why Choose WordPress for Site Creation
User-Friendly Interface: WordPress boasts an intuitive dashboard and user interface, making it accessible to individuals with varying levels of technical expertise. The platform simplifies the website creation process, allowing users to focus on content rather than intricate technical details.
Extensive Themes and Plugins: WordPress offers a vast library of themes and plugins that cater to different design preferences and functionalities. This flexibility enables users to customise their websites according to their specific needs, whether it’s a sleek portfolio, a blog, or a fully-fledged e-commerce site.
Community Support: WordPress benefits from an active and helpful community due to its open-source nature. Users can find solutions to common issues, access forums for troubleshooting, and benefit from regular updates that enhance security and functionality.
SEO-Friendly: Online visibility relies heavily on the critical aspect of search engine optimization (SEO). WordPress is inherently SEO-friendly, providing features and plugins that help optimise content, improve site speed, and enhance overall search engine performance.
Choosing WordPress for your site creation not only simplifies the process but also ensures scalability and adaptability as your website grows. In the following sections, we will delve into the step-by-step guide on how to create a WordPress site, exploring everything from domain registration to content management.
Getting Started with Your WordPress Site
Creating a WordPress site involves a few essential steps to set the foundation for your online presence. Now, let’s divide the process into easily manageable steps:
Signing up for a WordPress Account
Navigate to WordPress.com: To start, visit the WordPress.com website. Search for the button that says “Get Started” or “Start your website.”
Create an Account: Clicking on the button will lead you to the account creation page. Fill in the required details, including your email address, a username, and a secure password.
Choose a Plan: WordPress offers various plans, including a free plan with basic features and premium plans with additional functionalities. Select the plan that aligns with your website goals and budget.
Verify Your Email: After completing the sign-up process, check your email for a verification message from WordPress. Select the given link to confirm your email address and activate your account.
Choosing a Domain Name
Understand the Importance: Your domain name is your website’s address on the internet. It’s crucial as it represents your brand or identity. Choose a name that is memorable, reflects your content, and is easy to spell.
Check Availability: Use the domain checker tool on WordPress or other domain registration websites to see if your desired domain name is available. If not, be creative with variations or consider using different extensions like .net or .org.
Register Your Domain: Once you’ve found an available domain name, proceed to register it. This typically involves choosing a registration period (e.g., one year, two years) and providing your contact information.
Selecting a Hosting Provider
Understand Hosting: Hosting is where your website’s files and data are stored. It’s like renting space on the internet to make your site accessible to visitors.
Choose a Hosting Provider: WordPress recommends several hosting providers that are optimised for its platform. Some popular ones include Bluehost, SiteGround, and DreamHost. Evaluate their features, performance, and pricing to discover the most suitable option for your requirements.
Sign Up for a Hosting Plan: Once you’ve selected a hosting provider, sign up for a hosting plan that suits your website’s requirements. Take into account elements such as storage space, bandwidth, and customer support.
By following these steps, you’ve laid the groundwork for your WordPress site. In the upcoming sections, we’ll explore how to customise your site, add content, and make it uniquely yours.
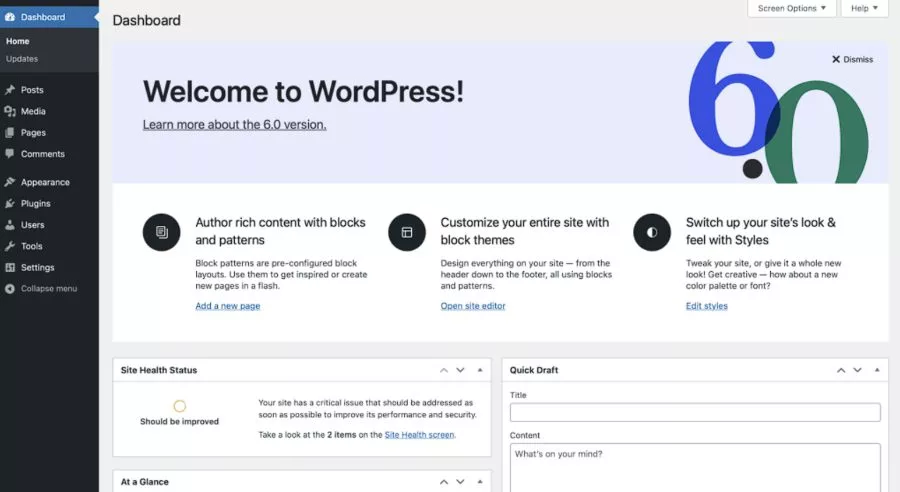
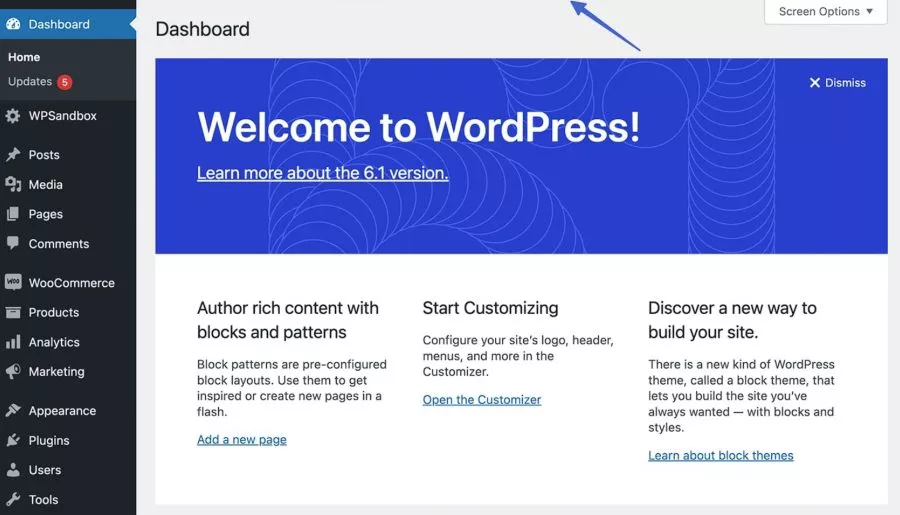
Understanding the WordPress Dashboard
The WordPress dashboard is your central command centre for managing and customising your WordPress site. Let’s explore the key aspects that will empower you to navigate and tailor the dashboard to suit your needs.
Accessing the Dashboard: Upon logging into your WordPress account, you’ll land on the dashboard. It is the first page you encounter, serving as the hub for controlling all aspects of your site.
Toolbar: The toolbar is located at the screen’s top. This toolbar provides quick access to essential functions, including creating new posts, pages, and accessing your site’s customization options.
Sidebar Menu: On the left side of the screen is the sidebar menu. This menu organises various options into sections such as Posts, Media, Pages, and more. Explore these sections to manage different aspects of your site efficiently.
Overview of Key Features
Posts and Pages: These are fundamental content types on your WordPress site. Posts are typically used for blog entries, while pages are static and are often used for essential information like the homepage, about page, or contact page.
Media Library: This is where all your images, videos, and other media files are stored. You can upload, edit, and manage your media content from this section.
Appearance: Under the Appearance tab, you can customise the look and feel of your WordPress site. This includes selecting themes, customising the site’s header and background, and managing widgets.
Plugins: Plugins enhance the functionality of your site. Explore and install plugins to add features like contact forms, social media integration, or SEO optimization.
Customising the Dashboard for Ease of Use
Screen Options: At the top right of the dashboard, you’ll find a tab labelled “Screen Options.” Clicking on it allows you to customise which elements are displayed on your dashboard, streamlining your view for a more focused work environment.
Widgets: The dashboard supports various widgets that provide at-a-glance information. You can customise these widgets to display the data most relevant to your needs, such as recent comments, site stats, or a calendar.
User Profiles: Consider adjusting your user profile settings under “Users” in the sidebar menu. This includes personalising your display name and configuring other preferences for an enhanced user experience.
Understanding the WordPress dashboard is pivotal to efficiently managing your WordPress site. Navigating its features, organising content, and customising the dashboard will empower you to make the most of this powerful platform.
Selecting the Appropriate Theme for Your WordPress Site
Selecting the perfect theme is a crucial step in shaping the visual identity and functionality of your WordPress site. Let’s delve into the process of exploring, evaluating, and implementing a theme that aligns seamlessly with your website goals.
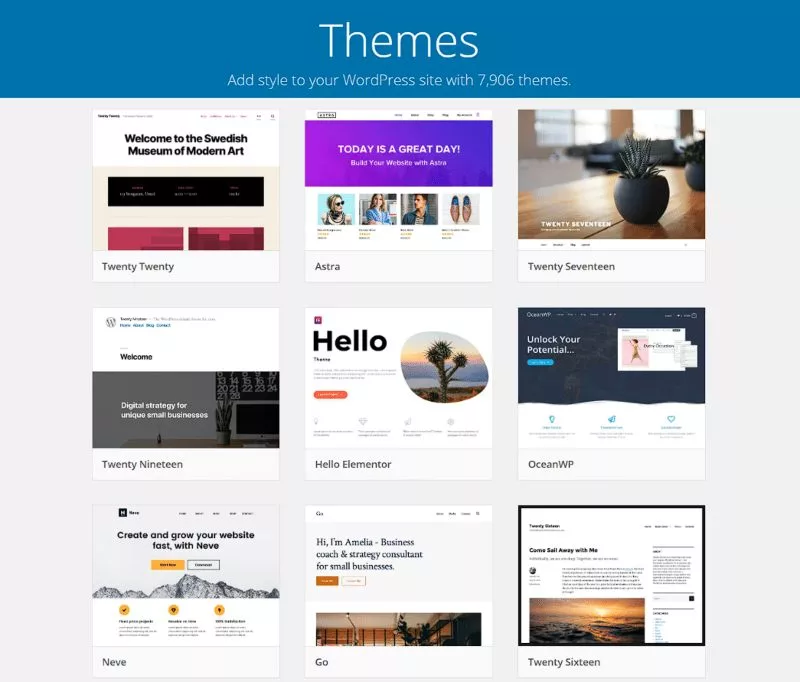
Exploring the WordPress Theme Repository
Access the Theme Repository: Navigate to the WordPress dashboard and locate the “Appearance” tab. Within this section, you’ll find the “Themes” option. Clicking on it will take you to the WordPress theme repository.
Browse Themes: The repository houses a diverse collection of free and premium themes. Browse through the options, filtering by categories, features, or popularity to discover themes that resonate with your site’s purpose and aesthetics.
Preview Themes: Before making a decision, take advantage of the theme preview feature. This allows you to see how your content will appear with different themes. Pay attention to layout, colour schemes, and overall design to ensure compatibility with your vision.
Factors to Consider When Selecting a Theme
Responsive Design: Opt for a theme that is responsive, ensuring your site looks and functions well on various devices, including smartphones and tablets.
Customization Options: Evaluate the theme’s customization capabilities. A good theme should offer flexibility in terms of colours, fonts, and layout, allowing you to tailor your site to your preferences.
Page Speed: Consider the impact of the theme on your site’s loading speed. A rapid-loading website is essential for both user experience and optimising search engine performance.
Plugin Compatibility: Make sure the theme is compatible with commonly used plugins. This compatibility ensures you can easily integrate additional features and functionalities into your site.
Installing and Activating a Theme
Install a Theme: Once you’ve found the perfect theme, click the “Install” button. WordPress will download and install the theme for you.
Activate the Theme: After installation, click the “Activate” button to make the theme live on your site. Your website’s appearance will now reflect the selected theme.
Customise Further: Head back to the “Appearance” tab and select “Customise” to access additional theme customization options. Here, you can make adjustments to fine-tune the theme according to your preferences.
Choosing the right theme is a significant step in establishing a visually appealing and functional WordPress site. By exploring the repository, considering essential factors, and seamlessly installing and activating your chosen theme, you set the stage for a captivating online presence.
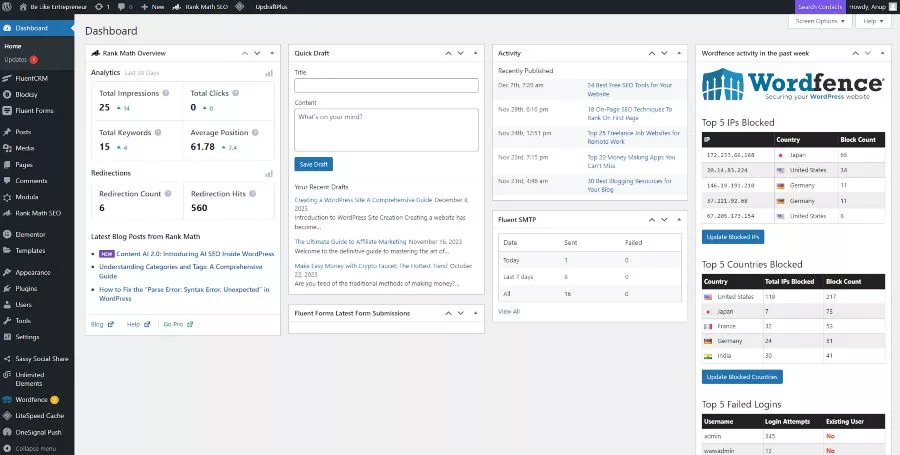
Essential Plugins for Your WordPress Site
Enhancing the functionality and security of your WordPress site involves incorporating essential plugins. These tools extend the capabilities of your site, ensuring optimal performance and user experience. Let’s explore the introduction to plugins, must-have plugins for critical functionalities, and the process of installing and configuring them.
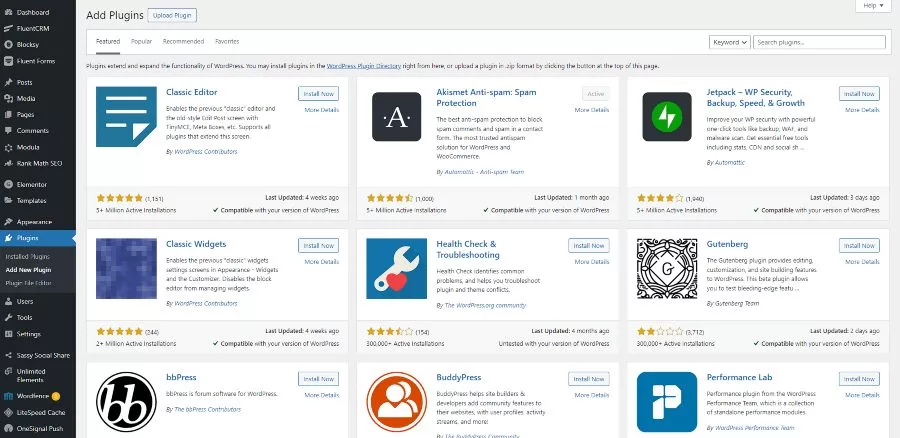
Introduction to Plugins
WordPress plugins are software components that add specific features and functionalities to your site. Think of them as apps for your website, allowing you to customise and extend its capabilities without delving into complex coding.
Must-Have Plugins for Functionality
1. SEO Optimization:
- Yoast SEO: This plugin is a powerhouse for optimising your site for search engines. It provides tools to improve on-page SEO, analyse content readability, and generate XML sitemaps.
2. Security Plugins:
- Wordfence Security: Security is paramount. Wordfence offers features like firewall protection, malware scanning, and login attempt monitoring to fortify your WordPress site against potential threats.
3. Contact Form Plugins:
- Contact Form 7: Engaging with your audience is simplified with a contact form. Contact Form 7 is a user-friendly plugin that allows you to create and manage multiple contact forms effortlessly.
Installing and Configuring Plugins
1. Access the Plugin Section:
- In your WordPress dashboard, navigate to the “Plugins” tab. Click on “Add New” to explore and install new plugins.
2. Search and Install:
- Search for the desired plugin using keywords like “SEO,” “security,” or “contact form.” Once you find the relevant plugin, click “Install Now.”
3. Activate the Plugin:
- After installation, activate the plugin to enable its features on your site. Activated plugins will appear in the “Installed Plugins” section.
4. Configure Settings:
- Each plugin comes with its own settings. Access these settings through the “Settings” or “Tools” menu in the dashboard. Configure the plugin according to your preferences and site requirements.
5. Regular Updates:
- Keep your plugins up to date. WordPress frequently releases updates for security and performance enhancements. Regularly check for updates and install them to ensure your plugins function optimally.
By incorporating these essential plugins and understanding the installation process, you elevate your WordPress site’s capabilities. From optimising your content for search engines to fortifying your site’s security and facilitating communication with your audience, plugins play a pivotal role in shaping a robust and functional website.
Creating Engaging Content for Your WordPress Site
Compelling content is the cornerstone of a successful WordPress site, drawing in visitors and keeping them engaged. Explore the significance of quality content, techniques for crafting attention-grabbing headlines, leveraging multimedia elements effectively, and tips for optimising your content for search engines.
Importance of Quality Content
Visitor Engagement: Quality content captivates your audience, encouraging them to spend more time on your site. Engaged visitors are more likely to explore multiple pages, reducing bounce rates and increasing the chances of conversions.
Establishing Authority: Well-researched and informative content positions you as an authority in your niche. It builds trust with your audience, making them more likely to return for future insights and recommendations.
Enhanced SEO Performance: Search engines favour high-quality, relevant content. Crafting content that resonates with your target audience improves your site’s visibility on search engine results pages (SERPs).
Crafting Compelling Headlines
Clarity and Conciseness: Craft headlines that clearly convey the main idea of your content. Keep them concise, ensuring they grab attention without being overwhelming.
Use of Keywords: Incorporate relevant keywords naturally into your headlines. This not only helps with SEO but also ensures that your content aligns with user search queries.
Evoke Curiosity: A compelling headline sparks curiosity. Pose a question, present a challenge, or promise valuable insights to entice readers to click and explore further.
Using Multimedia Elements Effectively
Visual Appeal: Break up text with images, infographics, and videos to enhance visual appeal. Visual elements not only make your content more engaging but also improve retention and understanding.
Consistency in Branding: Use multimedia elements that align with your brand’s aesthetic. Consistent visuals create a cohesive and recognizable identity for your WordPress site.
Accessibility Considerations: Make sure that all users can access multimedia elements by including alternative text for images and captions for videos, ensuring your content is inclusive.
Tips for Optimising Content for SEO
Keyword Research: Perform comprehensive keyword research to discover terms that are pertinent to your content. Integrate these keywords naturally into your text, headers, and meta descriptions.
Mobile Optimization: Optimise your content for mobile devices. With a significant portion of internet users accessing sites via mobile, mobile-friendly content is crucial for SEO.
Internal and External Linking: Include internal links to other relevant pages on your site and external links to reputable sources. This not only improves SEO but also enhances the user experience.
Crafting engaging content involves a thoughtful blend of quality, presentation, and optimization. By recognizing the importance of compelling content, mastering headline creation, utilising multimedia effectively, and implementing SEO strategies, you can elevate the impact of your WordPress site and foster a loyal and engaged audience.
Mastering the Art of Blogging for Your WordPress Site
Blogging is an art form that can elevate your WordPress site, providing a platform to share valuable content and engage with your audience. Let’s explore the key steps in mastering the art of blogging, including setting up a blog page, effective planning and scheduling of blog posts, and fostering reader interaction through comments.
Setting Up a Blog Page
Accessing the WordPress Dashboard: Begin by logging into your WordPress dashboard. Navigate to the “Pages” section and click on “Add New” to create a dedicated page for your blog.
Naming Your Blog Page: Choose a clear and concise title for your blog page. Something like “Blog” or “Latest Updates” works well to inform visitors about the content they can expect.
Customising the Layout: Utilise your theme’s customization options to ensure that the blog page aligns with the overall design and aesthetics of your WordPress site. Consistent branding enhances user experience.
Planning and Scheduling Blog Posts
Content Calendar: Establish a content calendar to plan and organise your blog posts. This ensures a consistent flow of content and helps you cover a diverse range of topics relevant to your audience.
Quality Over Quantity: While it’s important to be consistent, give priority to the quality of your content. Develop in-depth, informative, and engaging posts that resonate with your target audience.
Scheduling Posts: Use the scheduling feature in WordPress to set specific dates and times for your blog posts to go live. This allows you to maintain a steady stream of content without the need for manual publishing.
Interacting with Readers Through Comments
Enabling Comments: Make sure that comments are enabled on your blog posts. In your WordPress dashboard, navigate to “Settings” and then “Discussion” to configure your comment settings.
Responding Promptly: Actively engage with your readers by responding to comments promptly. This not only fosters a sense of community but also encourages more interactions on your WordPress site.
Moderating Comments: Regularly monitor and moderate comments to filter out spam and ensure a positive and constructive discussion environment. WordPress provides moderation tools to manage comments effectively.
Mastering the art of blogging involves a combination of strategic planning, consistent execution, and meaningful interactions with your audience. By setting up a dedicated blog page, planning and scheduling posts effectively, and engaging with readers through comments, you can create a dynamic and vibrant blogging experience on your WordPress site.
Customising Your WordPress Site with Widgets
Enhancing the functionality and appearance of your WordPress site involves leveraging widgets. Let’s delve into the world of widgets, providing an overview of their role, exploring popular options tailored for WordPress, and guiding you through the process of adding and arranging these dynamic elements on your site.
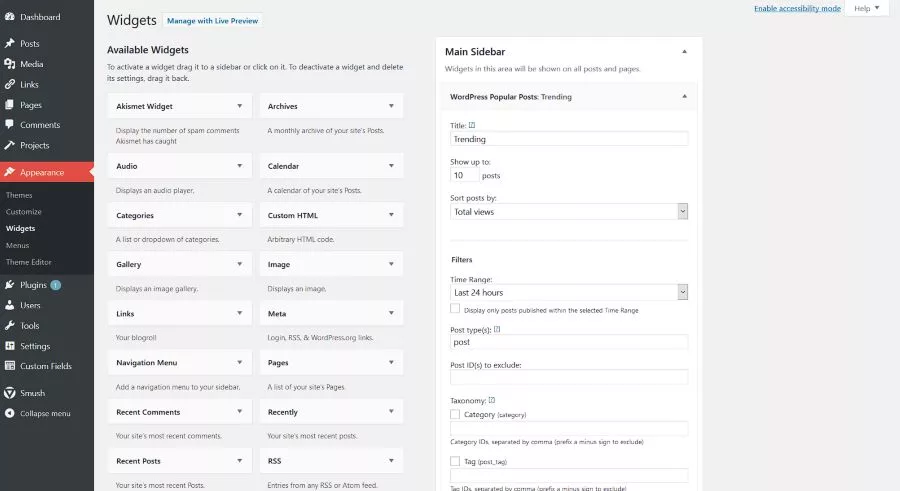
Overview of Widgets
Definition: Widgets are small, self-contained blocks that perform specific functions and can be added to various areas of your WordPress site.
Diverse Functionality: Widgets serve a range of purposes, from displaying recent posts and popular comments to integrating social media feeds and contact forms. They contribute to a dynamic and interactive user experience.
Popular Widgets for WordPress
1. Recent Posts Widget:
- Showcase your most recent blog posts, keeping visitors informed about your latest content.
2. Categories Widget:
- Organise your content by displaying a list of categories, helping users navigate your site more efficiently.
3. Tag Cloud Widget:
- Provide a visual representation of your post tags, adding a dynamic element to your site.
4. Search Bar Widget:
- Enhance user experience by allowing visitors to search for specific content directly from your site.
5. Social Media Feeds Widget:
- Integrate your social media activity, displaying feeds from platforms like Twitter, Instagram, or Facebook.
Adding and Arranging Widgets on Your Site
1. Access Widget Settings:
- In your WordPress dashboard, navigate to “Appearance” and select “Widgets.” Here, you’ll find the available widgets and widget-ready areas.
2. Drag and Drop Functionality:
- Adding widgets is as simple as dragging and dropping them into widget-ready areas such as sidebars, footers, or other designated sections of your theme.
3. Customising Widget Settings:
- Each widget comes with its own set of customization options. Configure these settings to align with your site’s design and functionality requirements.
4. Preview Changes:
- Utilise the preview feature to see how widgets will appear on your site before making them live. This ensures a seamless integration with your chosen theme.
Customising your WordPress site with widgets provides a user-friendly and visually appealing way to enhance its features. By understanding the role of widgets, exploring popular options tailored for WordPress, and confidently adding and arranging them on your site, you can create a dynamic and engaging online presence.
Optimising Your WordPress Site for Search Engines
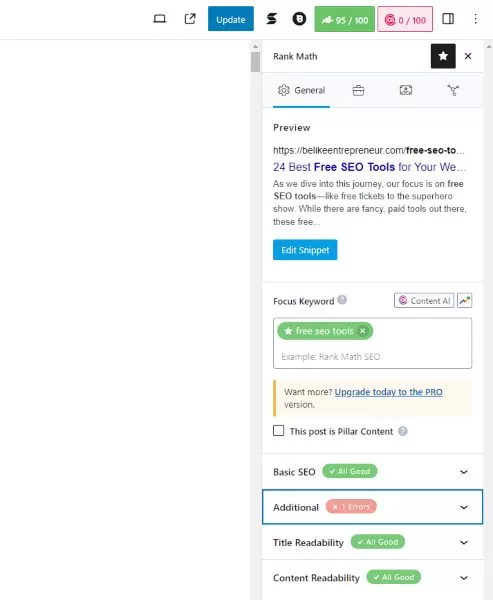
Boosting your WordPress site’s visibility on search engines is crucial for attracting organic traffic. Let’s dive into the essentials of search engine optimization (SEO) for WordPress, exploring the basics, leveraging SEO plugins, and creating an XML sitemap to enhance your site’s discoverability.
SEO Basics for WordPress
1. Keyword Research:
- Perform comprehensive keyword research to discover terms that are pertinent to your content. Integrate these keywords naturally into your posts, titles, and meta descriptions.
2. Quality Content:
- Craft high-quality, informative, and engaging content. Search engines give preference to content that delivers value to users.
3. Optimised URLs:
- Create user-friendly and descriptive URLs for your posts and pages. This not only contributes to SEO but also elevates the overall user experience.
Utilising SEO Plugins
1. Yoast SEO:
- Install and activate the Yoast SEO plugin. This powerful tool offers on-page SEO analysis, content readability checks, and the ability to set custom meta titles and descriptions.
2. All in One SEO Pack:
- Another popular option, the All in One SEO Pack plugin provides features like XML sitemap generation, Google Analytics support, and advanced settings for fine-tuning your SEO.
3. SEO Framework:
- The SEO Framework plugin offers a user-friendly interface and focuses on automating SEO processes, making it accessible for beginners while providing advanced features for experienced users.
Creating an XML Sitemap
1. Install a Sitemap Plugin:
- Choose a plugin like Yoast SEO or Google XML Sitemaps to generate an XML sitemap for your WordPress site.
2. Submit to Search Engines:
- Once the sitemap is generated, submit it to search engines like Google and Bing through their respective webmaster tools. This helps search engines understand the structure of your site for better indexing.
3. Regular Updates:
- Keep your XML sitemap updated. As you add new content to your site, the sitemap should reflect these changes to ensure search engines index the latest information.
Optimising your WordPress site for search engines involves a combination of foundational SEO practices, the use of dedicated plugins, and the creation of an XML sitemap. By understanding SEO basics, leveraging powerful plugins, and ensuring your site’s structure is easily navigable by search engines, you enhance its chances of ranking higher in search results and attracting a broader audience.
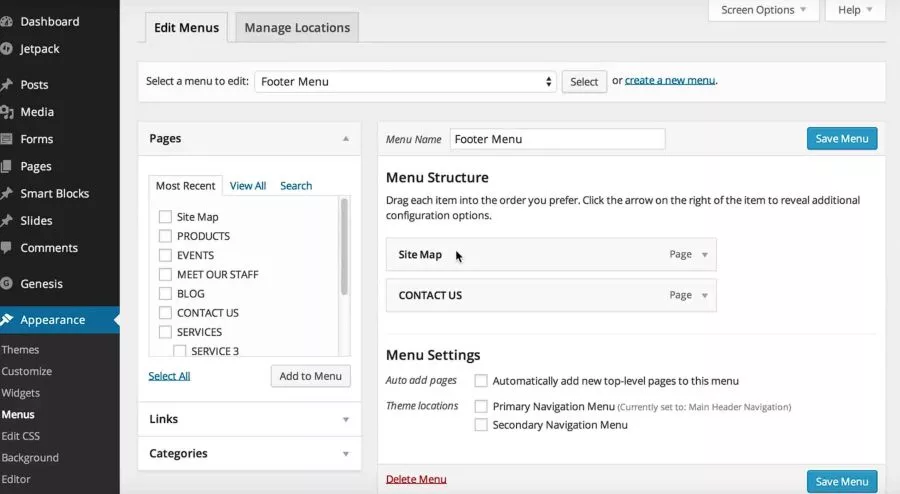
A seamless and user-friendly navigation system is pivotal for ensuring a positive experience on your WordPress site. Let’s explore the significance of user-friendly navigation, delve into the creation of a logical menu structure, and discuss the implementation of breadcrumbs to facilitate easy and intuitive navigation.
Visitor Retention: A user-friendly navigation system keeps visitors engaged by helping them find what they’re looking for quickly. This reduces bounce rates and encourages prolonged exploration of your content.
Improved Accessibility: Accessibility is key. An intuitive navigation structure ensures that users of all levels of technical proficiency can easily navigate and access different sections of your WordPress site.
Enhances SEO: Search engines favour sites with clear and user-friendly navigation. Structuring your site logically makes it easier for search engines to crawl and index your content, positively impacting your SEO efforts.
Creating a Logical Menu Structure
Identify Key Sections: Begin by identifying the primary sections or categories of content on your WordPress site. These could include pages like Home, About Us, Services, Blog, and Contact.
Prioritise in the Menu: Prioritise these sections based on importance and relevance. Place essential sections in the main menu, ensuring they are easily accessible to visitors.
Sub-Menus for Subsections: If your site has subsections or pages related to the main categories, use sub-menus to create a hierarchy. This helps organise content logically, making it easier for users to navigate.
1. Definition of Breadcrumbs:
- Breadcrumbs are a navigational aid that shows the user’s location on a site. They typically appear as a trail of links at the top of a page, indicating the path back to the homepage.
2. Benefits of Breadcrumbs:
- Enhanced User Orientation: Breadcrumbs provide users with context about their location within your site, improving overall orientation.
- Easy Backtracking: Users can easily backtrack to previous pages, fostering a more intuitive and user-friendly experience.
3. Adding Breadcrumbs in WordPress:
- Utilise plugins or your theme’s built-in options to implement breadcrumbs. WordPress offers various plugins that make the integration process simple and efficient.
Enhancing the user experience through effective navigation involves creating a logical menu structure and implementing features like breadcrumbs. By prioritising user-friendly design, you not only keep visitors engaged but also contribute to the overall success and accessibility of your WordPress site.
Optimising Mobile Responsiveness for Your WordPress Site
In today’s digital landscape, ensuring your WordPress site is mobile-friendly is paramount for reaching and engaging a diverse audience. Let’s delve into the significance of mobile-friendly design, explore testing and optimization strategies for mobile devices, and discuss the role of mobile-responsive themes and plugins in enhancing the user experience.

The Significance of Mobile-Friendly Design
User Accessibility: With an increasing number of users accessing websites via mobile devices, a mobile-friendly design ensures that visitors can easily navigate and interact with your content regardless of the device they are using.
Improved SEO Performance: Search engines prioritise mobile-friendly sites in their rankings. A mobile-responsive design contributes to a positive user experience, which, in turn, positively impacts your site’s search engine optimization (SEO).
Broader Audience Reach: A mobile-friendly WordPress site allows you to reach a broader audience, including users who predominantly browse the internet on smartphones and tablets.
Testing and Optimising for Mobile Devices
Responsive Design Testing: Use tools like Google’s Mobile-Friendly Test to assess your site’s responsiveness. This tool provides insights into how well your site performs on mobile devices and offers suggestions for improvement.
Page Loading Speed: Optimise images, reduce unnecessary elements, and utilise browser caching to enhance the loading speed of your site on mobile devices. Faster load times contribute to a smoother user experience.
User Testing: Enlist real users to test your site on various mobile devices. Gather feedback on navigation, readability, and overall usability to identify areas for improvement.
Mobile-Responsive Themes and Plugins
1. Choose a Responsive Theme:
- Select a WordPress theme that is inherently mobile-responsive. Many modern themes are designed to adapt seamlessly to different screen sizes, ensuring a consistent and visually appealing experience.
2. Mobile-Optimised Plugins:
- Explore and install plugins that optimise your site for mobile devices. These plugins may include features like touch-friendly sliders, mobile-optimised galleries, and other elements that enhance the mobile user experience.
3. Regular Updates:
- Ensure that both your theme and plugins receive regular updates. WordPress updates often include improvements for mobile responsiveness, security, and overall performance.
Optimising your WordPress site for mobile devices is a crucial step in providing an inclusive and accessible experience for your audience. By understanding the significance of mobile-friendly design, testing and optimising for various devices, and leveraging mobile-responsive themes and plugins, you position your site to thrive in the mobile-centric digital landscape.
Securing Your WordPress Website
Ensuring the safety of your WordPress website is crucial to safeguard your content and protect user information. Let’s explore the basics of common security threats, simple yet effective practices to fortify your site, and the practical use of security plugins to create a strong defence against potential risks.
Understanding Common Security Threats
1. Brute Force Attacks:
- Bad actors try to break into your site by systematically attempting various username and password combinations.
2. Malware Infections:
- Harmful software is designed to damage your site by injecting bad code, putting your content and visitors at risk.
3. Vulnerabilities in Themes and Plugins:
- Outdated or poorly coded themes and plugins can create weak points that attackers might exploit to access your WordPress site.
Best Practices for Securing Your Site
1. Regular Updates:
- Keep everything—your WordPress core, themes, and plugins—up to date. Updates often include fixes for security issues.
2. Strong Passwords:
- Use strong and unique passwords for all your accounts. Consider using a password manager to help create and store complex passwords securely.
3. Two-Factor Authentication (2FA):
- Enhance your security measures by implementing Two Factor Authentication (2FA). This means users need a second form of verification, like a code from a mobile app, along with their password.
4. Backup Your Site:
- Make regular backups of your WordPress site, including all its data. This ensures that if something goes wrong, you can quickly restore your site to a safe state.
Using Security Plugins Effectively
1. Choose a Reliable Security Plugin:
- Pick a well-reviewed and regularly updated security plugin for WordPress, such as Wordfence, Sucuri, or iThemes Security.
2. Firewall Protection:
- Use the firewall features of security plugins to keep an eye on and block suspicious traffic. This helps stop unauthorised access and minimises potential threats.
3. Malware Scanning:
- Turn on regular scans for malware to find and remove any bad code that might have sneaked into your site. Many security plugins offer automatic scanning features.
4. Login Attempt Monitoring:
- Set up alerts for multiple failed login attempts. This way, you can be quick to respond to potential security issues.
Understanding the basics of security threats, adopting simple security practices, and making good use of security plugins can create a strong defence for your WordPress site. Being vigilant and proactive in your approach will help maintain a secure online environment, protecting your site and earning the trust of your users.
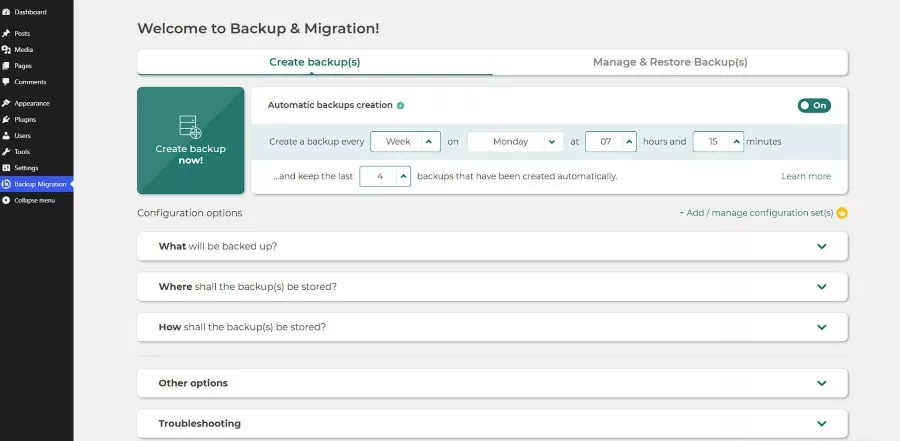
Safeguarding Your WordPress Site through Backups
Preserving the integrity of your WordPress site involves establishing a robust backup routine. Let’s delve into the importance of regular backups, explore methods for backing up your WordPress site, and discuss the efficiency of automating the backup process.
Importance of Regular Backups
1. Content Protection:
- Regular backups act as a safety net, ensuring that your valuable content, including posts, pages, and media, is secure and retrievable in case of unexpected events.
2. Mitigating Data Loss Risks:
- By consistently backing up your site, you mitigate the risks of data loss due to accidental deletions, technical glitches, or unforeseen issues that could impact your WordPress site.
3. Swift Recovery from Issues:
- In the event of a cyber attack, server failure, or other emergencies, having recent backups allows for a quicker recovery process, minimising downtime and potential disruptions.
Methods for Backing Up WordPress
1. Manual Backups:
- Manually backup your WordPress site by exporting your database and saving your site’s files. This approach gives you full command of the backup procedure.
2. Use of Backup Plugins:
- Employ reputable backup plugins like UpdraftPlus, BackWPup, or VaultPress. These plugins simplify the backup process, allowing you to schedule automatic backups and manage storage efficiently.
3. Web Hosting Backup Services:
- Many web hosting providers offer backup services as part of their packages. Check with your hosting provider to understand their backup procedures and options.
Automating the Backup Process
1. Scheduled Backups:
- Schedule regular automated backups to ensure consistency. Set up intervals that align with your content update frequency, ensuring you capture the latest changes.
2. Cloud Storage Integration:
- Automate the process of storing backups in the cloud, such as using services like Dropbox, Google Drive, or Amazon S3. This adds an extra level of security and ease of access.
3. Notification Alerts:
- Configure notification alerts to receive updates on the status of your backups. This proactive approach ensures you are informed of any issues promptly.
Establishing a routine for backing up your WordPress site is a fundamental aspect of maintaining its health and resilience. Recognizing the importance of regular backups, employing suitable methods, and embracing automation contribute to a secure and well-protected WordPress site, providing peace of mind for site owners and administrators.
Monetizing Your WordPress Site
Transforming your WordPress site into a revenue-generating platform involves exploring diverse monetization strategies. Let’s delve into various approaches, including the incorporation of ads and affiliate marketing, as well as creating and selling products or services.

Exploring Different Monetization Strategies
1. Affiliate Marketing:
- Explore partnerships with affiliate programs relevant to your niche. Promote products or services, earning commissions for every sale or lead generated through your referral.
2. Sponsored Content:
- Collaborate with brands for sponsored content. Publish articles, reviews, or features that highlight their products or services in exchange for compensation.
3. Membership/Subscriptions:
- Provide exclusive memberships or premium content offerings to your audience. Subscribers pay a recurring fee for access to specialised content, creating a steady revenue stream.
Incorporating Ads and Affiliate Marketing
1. Google AdSense:
- Integrate Google AdSense to display contextual ads on your site. Earn revenue based on clicks and impressions, leveraging the vast network of advertisers associated with Google.
2. Affiliate Marketing Integration:
- Strategically incorporate affiliate marketing within your content. Promote products or services relevant to your audience, fostering trust and increasing the likelihood of conversions.
3. Direct Ad Sales:
- Sell ad space directly to businesses or advertisers interested in reaching your audience. This approach allows for more control over pricing and ad placements.
Creating and Selling Products/Services
1. E-Commerce Integration:
- Set up an e-commerce platform on your WordPress site using plugins like WooCommerce. Offer your audience physical or digital products for direct purchase.
2. Online Courses and Workshops:
- Share your knowledge by developing and selling online courses or workshops. Utilise platforms like Teachable or integrate with plugins that support course creation.
3. Consulting or Services:
- Offer consulting services or specialised expertise directly through your WordPress site. Use dedicated pages to outline your services, rates, and contact information.
Monetizing your WordPress site requires a thoughtful combination of strategies tailored to your content and audience. By exploring diverse monetization approaches, incorporating ads and affiliate marketing seamlessly, and considering the creation and sale of products or services, you can establish a sustainable revenue model for your online platform.
Integrating Social Media with Your WordPress Site
Elevating your WordPress site’s social presence involves seamless integration with various platforms. Let’s explore connecting your site with social media platforms, showcasing social media feeds directly on your site, and fostering social sharing to enhance engagement.

Connecting Your Site with Social Media Platforms
1. Social Media Account Setup:
- Begin by creating accounts for your WordPress site on popular social media platforms such as Facebook, Twitter, Instagram, and LinkedIn.
2. Linking Social Media Profiles:
- Integrate social media profiles with your WordPress site. This typically involves adding social media icons to your site, directing users to your respective profiles.
3. Automated Sharing:
- Utilise plugins that allow for automated sharing of your WordPress site’s content on connected social media accounts. This enhances visibility and drives traffic.
Displaying Social Media Feeds on Your Site
1. Embedding Feeds:
- Integrate social media feeds directly onto your WordPress site. Embedding feeds from platforms like Instagram or Twitter keeps your site dynamic and up-to-date.
2. Customization Options:
- Explore customization features to ensure the displayed social media feeds align with your site’s design and aesthetics. Consistent branding fosters a cohesive user experience.
3. Real-Time Updates:
- Choose options that provide real-time updates, ensuring that your audience stays informed about your latest social media activity directly through your WordPress site.
Encouraging Social Sharing
1. Incorporate Share Buttons:
- Strategically place social media share buttons on your content. This allows visitors to easily share articles, pages, or products across their own social networks.
2. Optimised Share Descriptions:
- Craft compelling share descriptions to accompany your content. This encourages users to share your material with personalised and engaging captions.
3. Social Sharing Plugins:
- Implement social sharing plugins that provide a range of features, from floating share bars to customizable buttons. These plugins enhance the ease and visibility of social sharing.
Integrating social media with your WordPress site is a powerful strategy for expanding your online presence. By connecting with social media platforms, displaying dynamic feeds, and actively encouraging social sharing, you create a synergistic relationship that fosters engagement and amplifies the reach of your WordPress site’s content.
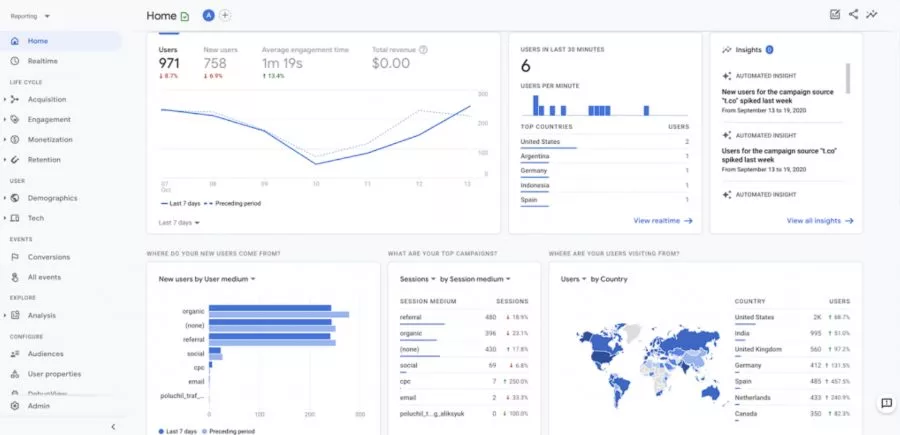
Analytics and Tracking for Your WordPress Site
Harnessing the power of data is essential for understanding and optimising the performance of your WordPress site. Let’s explore the process of setting up Google Analytics, the importance of monitoring site performance, and how to leverage data for continuous improvement.
Setting Up Google Analytics
1. Account Creation:
- Begin by creating a Google Analytics account. If you already have a Google account, you can seamlessly set up Analytics through the Google Analytics platform.
2. Website Property Setup:
- Add your WordPress site as a new property in Google Analytics. Follow the prompts to provide essential details about your site and generate a unique tracking code.
3. Integration with WordPress:
- Utilise plugins or your theme’s built-in options to integrate the generated Google Analytics tracking code into your WordPress site. This ensures seamless data collection.
Monitoring Site Performance
1. Traffic Analysis:
- Use Google Analytics to monitor traffic to your WordPress site. Understand the sources of traffic, including organic search, referral links, and social media, to gauge the effectiveness of your online presence.
2. Pageviews and Bounce Rate:
- Analyse pageviews and bounce rates to assess the popularity and engagement of specific pages. A low bounce rate and high pageviews indicate content resonance with your audience.
3. Device and Location Metrics:
- Explore device and location metrics to understand the diversity of your audience. This insight helps optimise your site for different devices and tailor content for specific geographic regions.
Utilising Data for Improvement
1. Content Performance Analysis:
- Evaluate the performance of individual pieces of content. Identify popular articles, pages, or products to replicate successful strategies and refine less-engaging content.
2. User Behaviour Insights:
- Gain insights into user behaviour, including the most visited paths through your site. Use this information to enhance user experience by optimising navigation and content flow.
3. Conversion Tracking:
- Implement conversion tracking to monitor specific actions users take on your site, such as form submissions or product purchases. Analysing conversion data helps refine your site’s objectives.
Analysing data through tools like Google Analytics empowers you to make informed decisions for your WordPress site. By setting up Analytics, continuously monitoring site performance, and leveraging data for improvement, you create a data-driven approach that enhances the effectiveness and user experience of your WordPress site.
Troubleshooting Common Issues on Your WordPress Site
Ensuring the smooth operation of your WordPress site involves addressing and resolving common issues promptly. Let’s delve into the identification of prevalent WordPress issues, troubleshooting conflicts related to themes and plugins, and seeking assistance from the vibrant WordPress community.

Identifying Common WordPress Issues
1. Slow Loading Times:
- Identify and address slow loading times, which can result from large image files, excessive plugins, or inadequate hosting resources.
2. 404 Page Errors:
- Troubleshoot and fix 404 errors by checking permalinks, ensuring proper page/post URLs, and confirming the existence of the content.
3. White Screen of Death:
- Address the “White Screen of Death” by investigating plugin conflicts, theme issues, or PHP errors that might be causing the problem.
Troubleshooting Theme and Plugin Conflicts
1. Deactivating Plugins:
- Identify conflicting plugins by deactivating them one by one and checking if the issue persists. This helps pinpoint the specific plugin causing the conflict.
2. Switching Themes:
- If issues persist, switch to a default WordPress theme to determine if the problem is theme-related. This helps differentiate between theme and plugin conflicts.
3. Updating Themes and Plugins:
- Ensure all themes and plugins are updated to their latest versions. Incompatibility issues often arise when using outdated versions.
Seeking Help from the WordPress Community
1. WordPress Forums:
- Engage with the vast WordPress community through forums. Share details about your issue and seek advice from experienced users and developers.
2. Online Documentation:
- Consult official WordPress documentation and user guides for troubleshooting tips specific to common problems. WordPress provides comprehensive resources for users at all levels.
3. Professional Support:
- Consider seeking professional support from WordPress developers or experts if the issue persists. Many developers offer services to diagnose and resolve complex problems.
Addressing common issues on your WordPress site involves a systematic approach of identifying problems, troubleshooting conflicts, and seeking community support. By staying proactive and leveraging resources within the WordPress community, you can maintain the functionality and reliability of your WordPress site.
As we reach the culmination of your WordPress site creation journey, let’s recap the key steps, encourage a commitment to ongoing learning and improvement, and reflect on the profound experience of bringing your website to life.
Recap of Key Steps in Creating a WordPress Site
1. Inception and Planning:
- Embarked on the journey with a clear vision and plan for your WordPress site, outlining objectives, content structure, and design preferences.
2. Getting Started:
- Initiated the process by signing up for a WordPress account, selecting a domain name, and choosing a hosting provider to lay the foundation for your online presence.
3. Navigating the Dashboard:
- Explored the WordPress dashboard, mastering navigation, and customising settings for optimal ease of use.
4. Choosing the Right Theme:
- Delved into the theme selection process, exploring the theme repository, considering factors like design and functionality, and successfully installing and activating a theme that aligns with your site’s identity.
5. Essential Plugins:
- Introduced essential plugins to enhance your site’s functionality, focusing on SEO optimization, security, and contact form integration.
6. Creating Engaging Content:
- Embraced the art of crafting compelling content, optimizing for SEO, and ensuring multimedia elements contribute to a rich and inclusive user experience.
7. Monetization and Beyond:
- Explored various avenues for monetizing your WordPress site, whether through affiliate marketing, ad integration, or the creation and sale of products and services.
8. Analytics and Troubleshooting:
- Implemented analytics tools like Google Analytics for data-driven insights and acquired troubleshooting skills to address common issues effectively.
Encouragement for Ongoing Learning and Improvement
1. Embrace a Learning Mindset:
- Acknowledge that the digital landscape is ever-evolving. Stay curious and committed to continuous learning to adapt to new trends, technologies, and user expectations.
2. Community Engagement:
- Actively participate in the WordPress community, whether through forums, events, or online groups. Share your insights, seek guidance, and actively contribute to the community’s shared knowledge.
Final Thoughts on the Journey of Website Creation
Creating a WordPress site is not just a technical endeavour; it’s a journey of creativity, resilience, and self-discovery. Your website is a reflection of your vision and passion, and as you continue refining and expanding it, remember that the learning never truly ends. Each challenge is an opportunity to grow, and every improvement contributes to a more vibrant and impactful online presence.
In closing, celebrate the milestones achieved, embrace the ongoing journey of improvement, and relish the profound satisfaction of having created a unique and dynamic WordPress site. May your digital endeavours continue to thrive and evolve, leaving an enduring mark on the vast landscape of the internet.
Frequently Asked Questions (FAQs) for Your WordPress Site
Embarking on the journey of creating your WordPress site may lead to some common queries. Let’s address these questions to offer clear insights and assistance.
Q1. How can I choose an appropriate domain name for my WordPress site?
Selecting the perfect domain name is a vital decision. Here are key considerations:
- Relevance: Choose a name that aligns with your site’s content or purpose.
- Memorability: Opt for a name that is easy to recall and spell.
- Avoid Hyphens and Numbers: Keep it straightforward to enhance memorability.
Q2. Is it possible to change my WordPress theme later on?
Absolutely, you can change your WordPress theme whenever needed. Follow these steps:
- Go to the “Appearance” section in your dashboard.
- Click on “Themes” to explore and activate a new theme.
- Ensure the new theme meets your site’s design and functionality requirements.
Q3. What are the recommended SEO practices for a WordPress site?
Boosting your site’s visibility through SEO involves key practices:
- Keyword Research: Identify pertinent keywords for your content.
- Optimised Content: Craft compelling content with well-placed keywords.
- Permalinks: Use SEO-friendly permalinks for posts and pages.
- XML Sitemap: Create and submit an XML sitemap to enhance search engine indexing.
Q4. How frequently should I back up my WordPress site?
Regular backups are pivotal. Consider this backup schedule:
- Daily: Suitable for active sites with frequent updates.
- Weekly: Ideal for sites with moderate update frequencies.
- Monthly: Appropriate for static or less frequently updated sites.
Q5. What security measures should I implement for my WordPress site?
Securing your WordPress site is of utmost importance. Follow these security measures:
Ensure your WordPress installation, themes & plugins are regularly updated.
- Strong Passwords: Utilise complex and unique passwords.
- Security Plugins: Install reputable security plugins for additional protection.
- Backup: Regularly backup your site to mitigate potential risks.
Feel free to explore further resources or seek guidance from the WordPress community for more personalised assistance on these topics.
You May Also Like:
How to Start a Blog – Step By Step Guide For Beginners
Top 25 Freelance Job Websites for Remote Work
18 On-Page SEO Techniques To Rank On First Page
30 Best Blogging Resources for Your Blog